
This guide provides an overview of the HDFS Federation feature and how to configure and manage the federated cluster.

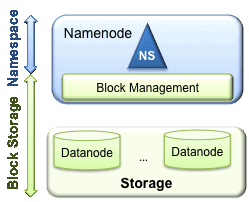
HDFS has two main layers:
Block Storage Service, which has two parts:
The prior HDFS architecture allows only a single namespace for the entire cluster. In that configuration, a single Namenode manages the namespace. HDFS Federation addresses this limitation by adding support for multiple Namenodes/namespaces to HDFS.
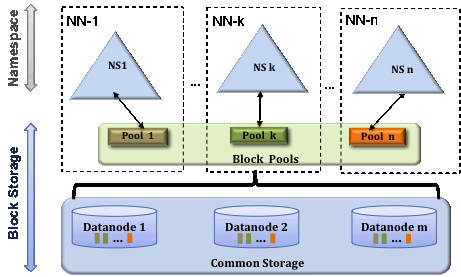
In order to scale the name service horizontally, federation uses multiple independent Namenodes/namespaces. The Namenodes are federated; the Namenodes are independent and do not require coordination with each other. The Datanodes are used as common storage for blocks by all the Namenodes. Each Datanode registers with all the Namenodes in the cluster. Datanodes send periodic heartbeats and block reports. They also handle commands from the Namenodes.
Users may use ViewFs to create personalized namespace views. ViewFs is analogous to client side mount tables in some Unix/Linux systems.

Block Pool
A Block Pool is a set of blocks that belong to a single namespace. Datanodes store blocks for all the block pools in the cluster. Each Block Pool is managed independently. This allows a namespace to generate Block IDs for new blocks without the need for coordination with the other namespaces. A Namenode failure does not prevent the Datanode from serving other Namenodes in the cluster.
A Namespace and its block pool together are called Namespace Volume. It is a self-contained unit of management. When a Namenode/namespace is deleted, the corresponding block pool at the Datanodes is deleted. Each namespace volume is upgraded as a unit, during cluster upgrade.
ClusterID
A ClusterID identifier is used to identify all the nodes in the cluster. When a Namenode is formatted, this identifier is either provided or auto generated. This ID should be used for formatting the other Namenodes into the cluster.
Federation configuration is backward compatible and allows existing single Namenode configurations to work without any change. The new configuration is designed such that all the nodes in the cluster have the same configuration without the need for deploying different configurations based on the type of the node in the cluster.
Federation adds a new NameServiceID abstraction. A Namenode and its corresponding secondary/backup/checkpointer nodes all belong to a NameServiceId. In order to support a single configuration file, the Namenode and secondary/backup/checkpointer configuration parameters are suffixed with the NameServiceID.
Step 1: Add the dfs.nameservices parameter to your configuration and configure it with a list of comma separated NameServiceIDs. This will be used by the Datanodes to determine the Namenodes in the cluster.
Step 2: For each Namenode and Secondary Namenode/BackupNode/Checkpointer add the following configuration parameters suffixed with the corresponding NameServiceID into the common configuration file:
| Daemon | Configuration Parameter |
|---|---|
| Namenode | dfs.namenode.rpc-address dfs.namenode.servicerpc-address dfs.namenode.http-address dfs.namenode.https-address dfs.namenode.keytab.file dfs.namenode.name.dir dfs.namenode.edits.dir dfs.namenode.checkpoint.dir dfs.namenode.checkpoint.edits.dir |
| Secondary Namenode | dfs.namenode.secondary.http-address dfs.secondary.namenode.keytab.file |
| BackupNode | dfs.namenode.backup.address dfs.secondary.namenode.keytab.file |
Here is an example configuration with two Namenodes:
<configuration>
  <property>
    <name>dfs.nameservices</name>
    <value>ns1,ns2</value>
  </property>
  <property>
    <name>dfs.namenode.rpc-address.ns1</name>
    <value>nn-host1:rpc-port</value>
  </property>
  <property>
    <name>dfs.namenode.http-address.ns1</name>
    <value>nn-host1:http-port</value>
  </property>
  <property>
    <name>dfs.namenode.secondary.http-address.ns1</name>
    <value>snn-host1:http-port</value>
  </property>
  <property>
    <name>dfs.namenode.rpc-address.ns2</name>
    <value>nn-host2:rpc-port</value>
  </property>
  <property>
    <name>dfs.namenode.http-address.ns2</name>
    <value>nn-host2:http-port</value>
  </property>
  <property>
    <name>dfs.namenode.secondary.http-address.ns2</name>
    <value>snn-host2:http-port</value>
  </property>

  .... Other common configuration ...
</configuration>
Step 1: Format a Namenode using the following command:
[hdfs]$ $HADOOP_PREFIX/bin/hdfs namenode -format [-clusterId <cluster_id>]
Choose a unique cluster_id which will not conflict other clusters in your environment. If a cluster_id is not provided, then a unique one is auto generated.
Step 2: Format additional Namenodes using the following command:
[hdfs]$ $HADOOP_PREFIX/bin/hdfs namenode -format -clusterId <cluster_id>
Note that the cluster_id in step 2 must be same as that of the cluster_id in step 1. If they are different, the additional Namenodes will not be part of the federated cluster.
Older releases only support a single Namenode. Upgrade the cluster to newer release in order to enable federation During upgrade you can provide a ClusterID as follows:
[hdfs]$ $HADOOP_PREFIX/bin/hdfs start namenode --config $HADOOP_CONF_DIR -upgrade -clusterId <cluster_ID>
If cluster_id is not provided, it is auto generated.
Perform the following steps:
Add dfs.nameservices to the configuration.
Update the configuration with the NameServiceID suffix. Configuration key names changed post release 0.20. You must use the new configuration parameter names in order to use federation.
Add the new Namenode related config to the configuration file.
Propagate the configuration file to the all the nodes in the cluster.
Start the new Namenode and Secondary/Backup.
Refresh the Datanodes to pickup the newly added Namenode by running the following command against all the Datanodes in the cluster:
[hdfs]$ $HADOOP_PREFIX/bin/hdfs dfsadmin -refreshNamenodes <datanode_host_name>:<datanode_rpc_port>
To start the cluster run the following command:
[hdfs]$ $HADOOP_PREFIX/sbin/start-dfs.sh
To stop the cluster run the following command:
[hdfs]$ $HADOOP_PREFIX/sbin/stop-dfs.sh
These commands can be run from any node where the HDFS configuration is available. The command uses the configuration to determine the Namenodes in the cluster and then starts the Namenode process on those nodes. The Datanodes are started on the nodes specified in the slaves file. The script can be used as a reference for building your own scripts to start and stop the cluster.
The Balancer has been changed to work with multiple Namenodes. The Balancer can be run using the command:
[hdfs]$ $HADOOP_PREFIX/sbin/hadoop-daemon.sh start balancer [-policy <policy>]
The policy parameter can be any of the following:
datanode - this is the default policy. This balances the storage at the Datanode level. This is similar to balancing policy from prior releases.
blockpool - this balances the storage at the block pool level which also balances at the Datanode level.
Note that Balancer only balances the data and does not balance the namespace. For the complete command usage, see balancer.
Decommissioning is similar to prior releases. The nodes that need to be decomissioned are added to the exclude file at all of the Namenodes. Each Namenode decommissions its Block Pool. When all the Namenodes finish decommissioning a Datanode, the Datanode is considered decommissioned.
Step 1: To distribute an exclude file to all the Namenodes, use the following command:
[hdfs]$ $HADOOP_PREFIX/sbin/distribute-exclude.sh <exclude_file>
Step 2: Refresh all the Namenodes to pick up the new exclude file:
[hdfs]$ $HADOOP_PREFIX/sbin/refresh-namenodes.sh
The above command uses HDFS configuration to determine the configured Namenodes in the cluster and refreshes them to pick up the new exclude file.
Similar to the Namenode status web page, when using federation a Cluster Web Console is available to monitor the federated cluster at http://<any_nn_host:port>/dfsclusterhealth.jsp. Any Namenode in the cluster can be used to access this web page.
The Cluster Web Console provides the following information:
A cluster summary that shows the number of files, number of blocks, total configured storage capacity, and the available and used storage for the entire cluster.
A list of Namenodes and a summary that includes the number of files, blocks, missing blocks, and live and dead data nodes for each Namenode. It also provides a link to access each Namenode’s web UI.
The decommissioning status of Datanodes.